Pages

Showing posts with label hard disk. Show all posts

4 Ways to Speed up Your Computer's Performance


There are a few guidelines that you can follow to maintain your computer and keep it running smoothly. This article discusses how to use the tools available in Windows XP Service Pack 2 (SP2) to more efficiently maintain your computer and safeguard your privacy when you're online.

1. Free Up Disk Space

By freeing disk space, you can improve the performance of your computer. The Disk Cleanup tool helps you free up space on your hard disk. The utility identifies files that you can safely delete, and then enables you to choose whether you want to delete some or all of the identified files.
Use Disk Cleanup to:
• Remove temporary Internet files.
• Remove downloaded program files (such as Microsoft ActiveX controls and Java applets).
• Empty the Recycle Bin.
• Remove Windows temporary files.
• Remove optional Windows components that you don't use.
• Remove installed programs that you no longer use.
Tip: Typically, temporary Internet files take the most amount of space because the browser caches each page you visit for faster access later.
To use Disk Cleanup
1. Click Start, point to All Programs, point to Accessories, point to System Tools, and then click Disk Cleanup. If several drives are available, you might be prompted to specify which drive you want to clean. Disk Cleanup calculates the amount of space you will be able to free.


2. In the Disk Cleanup for dialog box, scroll through the content of the Files to delete list. Choose the files that you want to delete.

3. Clear the check boxes for files that you don't want to delete, and then click OK.

4. When prompted to confirm that you want to delete the specified files, click Yes. After a few minutes, the process completes and the Disk Cleanup dialog box closes, leaving your computer cleaner and performing better.

2. Speed Up Access to Data

Disk fragmentation slows the overall performance of your system. When files are fragmented, the computer must search the hard disk when the file is opened to piece it back together. The response time can be significantly longer.
Disk Defragmenter is a Windows utility that consolidates fragmented files and folders on your computer's hard disk so that each occupies a single space on the disk. With your files stored neatly end-to-end, without fragmentation, reading and writing to the disk speeds up.
When to Run Disk Defragmenter
In addition to running Disk Defragmenter at regular intervals, optimally monthly, certain events warrant running the utility outside of the monthly rule of thumb. You should run Disk Defragmenter under the following circumstances:
• You add a large number of files.
• Your free disk space nears 15 percent.
• You install new programs or a new version of Windows.

3. Detect and Repair Disk Errors

In addition to running Disk Cleanup and Disk Defragmenter to optimize the performance of your computer, you can check the integrity of the files stored on your hard disk by running the Error Checking utility.
As you use your hard drive, it can develop bad sectors. Bad sectors slow down hard disk performance and sometimes make data writing (such as file saving) difficult, or even impossible. The Error Checking utility scans the hard drive for bad sectors, and scans for file system errors to see whether certain files or folders are misplaced. If you use your computer daily, you should try to run this utility weekly to help
prevent data loss.
To run the Error Checking utility:
Important: Be sure to close all files before running the Error-Checking utility.
1. Click Start, and then click My Computer.
2. In the My Computer window, right-click the hard disk you want to search for bad sectors, and then click Properties.
3. In the Properties dialog box, click the Tools tab.
4. Click the Check Now button.
5. In the Check Disk dialog box, select the Scan for and attempt recovery of bad sectors check box, and then click Start. In most circumstances, select Scan for and attempt recovery of bad sectors
6. If bad sectors are found, choose to fix them
Tip: Only select the automatically fix file system errors check box if you think that your disk contains bad sectors.


4. Protect Your Computer Against Spyware

Spyware collects personal information without letting you know and without asking for permission. The information that spyware collects ranges from a list of Web sites that you visit to usernames and passwords. In addition to privacy concerns, spyware can hamper your computer's
performance.


How to Remove Hard Drive Partition (Without Software)


Unpartitioning a drive merges that particular partition into the original drive. It adds more space or extends the volume of the original drive which had been partitioned.
Removing hard drive partition is a good thing to consider especially if you intend to sell your computer or external hard drive. This is a way of restoring the drive to its factory default.
please note that before you engage this process, it is wise to backup or copy to another location the contents of the specific partition your seek to unpartition.

How to Remove Drive Partition:
1.  Go to "Disk management tool".
Windows happens to have this tool preinstalled. It shows you all the drives connected to your drive (including external hard drives). Locate the tool via any of this three ways
ü  Go to “start menu” and type “disk management”.
ü  Open run from start menu and type in enter diskmgmt.msc, it will take you to disk management straight

ü  Right click on my computer, scroll down and select manage. Select “disk management” under storage from the left pane.
2.   Delete the partition
If you have copied that you need from that partition then proceed, else I will advice that you do so first of all.
ü  Right click on the partition you wish to remove and click delete from the drop down menu.


ü  The partition should now be designated as unallocated space.


3.   Allocate the space back to the original partitioned drive
To mere the unallocated space, go to the drive from which the deleted partition was created. Right click on it and select “extend volume” from the drop down menu.
A wizard will automatically popped up when you clicked extend volume. Keep selecting next to progress through the wizard. Click on finish when it’s available.


And that’s how to delete your unwanted partition with software…..don’t forget to like, share and comment!


How to Partition Hard Disk on Windows 7/8/Vista

Partitioning a hard disk from “my computer” is like creating a new and distinct from your hard disk. Hard disk partitioning has to do with compartmentalising or separating your disk into parts to suit your own purpose.

To do this simple task, you need to first of all activate administrative privilege on your computer

How to partition a drive: 
     1. After you right click on my computer, scroll down and select manage. Select “disk management” under storage from the left pane. Alternatively, you can open “run” from the start menu and enter diskmgmt.msc, it will take you to disk management straight.


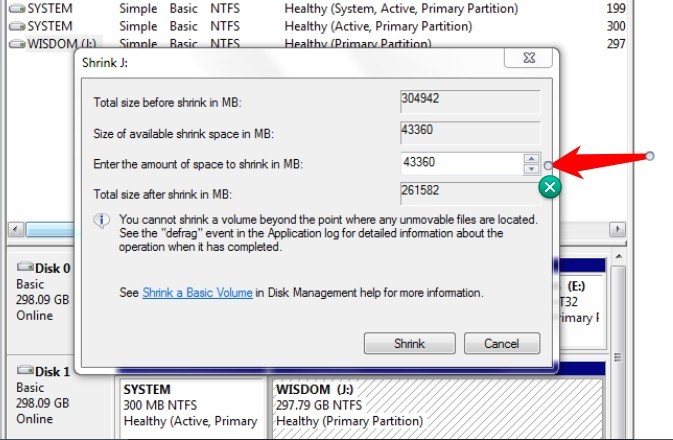
2. Now, select the particular drive from which you seek to create new volume by right clicking on the drive and clicking “Shrink volume” from the drop down menu that appears.

3. Please note that 1GB = 1024MB, so all you need to do once the window shown above appears is to calculate in MB the total disk space you want for the new volume and enter it into the box labelled, “Enter The Amount of Space to Shrink”.
For example, I need 10GB of disk space thus 1GB = 1024MB then for 10GB I will multiply 10 * 1024 = 10240MB. Enter the value into the box and click on “shrink”.


4. Your new volume is currently designated as “unallocated”. Right click on it and select “New Simple Volume”. Couple of windows will appear so you can customise your new volume by changing stuff like the drive letter and naming the newly created volume.
Keep clicking next until you’re done. Click on finish when you’re done, you should have the new partition up and running. Go to “My computer” to preview.


Well guys! That’s all it takes to partition your hard disk, no need of any software to do it. Both your parent and new partitions are working perfectly. If this tutorial helps you, why don’t you share or rate this? I will also appreciate your comments below, thanks…!